Monday, October 28, 2013

Today's mani: jack-o'-lanterns

Halloween is almost here! There's just enough time for one more spooky mani...


When I make jack-o'-lanterns, I usually go for funny or happy faces rather than scary ones. I'm just not into horror, I guess! Actually, the best part of jack-o'-lanterns for me is roasting and eating the seeds afterwards!

For this mani I used Revlon Stiletto, Orange Pop and Posh, plus Sally Hansen Lightening.

Enjoy the last few days of October! Winter is coming...

Friday, October 25, 2013

Today's mani: Halloween jelly sandwich

This is the first decent-looking jelly sandwich mani I've done!


I used two coats L'Oreal The Bigger the Better (black and silver glitter) in between three coats of Zoya Coraline. Halloween orange is pretty much the only shade of orange that looks good on me!

Wednesday, October 23, 2013

Today's mani: psycho killer

It's about time I got around to doing some Halloween nail art, right?


Cue the screeching violins! This is the first time I've done a drip mani, and I found it fun and easy. I used Revlon Stiletto for the black, Zoya Carmen for the blood red, and Sally Hansen Lightening for the yellow (I was trying to make it look like a lightning bolt illuminating the knife, don't think I pulled it off). I drew the knife-wielding psycho with a Sally Hansen black nail art pen.

I'll probably try one more Halloween mani this week--jack 'o' lanterns maybe?

Anybody planning on dressing up this year?

Tuesday, October 22, 2013

I made food: black bean soup

Before I get started, it's time to announce the winner of the Indigo Bananas giveaway!! And the winner is...

...drumroll please...

Entry #40: Kathryn T.!

Congratulations! You have 48 hours to let me know which polishes you'd like!

Thanks to everyone else who entered, followed and liked--it's great to have you here!

Now on to the food. It's soup season again, so the other day I made this really simple and tasty black bean soup. I got the recipe from How to Cook Everything (gotta keep pimping this cookbook, it's just so good). Here's my not-so-great picture:


Like I said, it's very simple (and quick too): chop up two medium onions and a few cloves of garlic. Cook the onions in a little bit of neutral oil  (I used grapeseed) until they're soft, then add the garlic and a tablespoon of chili powder and cook a minute longer. Add 3 cups (about 2 cans) of cooked black beans, 4 cups of any kind of stock, and salt and pepper (also, if you're not a wuss like me, you can put in a chile pepper). Bring everything to a boil, then simmer for about 10 minutes. If you like, you can puree some or all of the soup to thicken it up--I used my immersion blender but didn't puree the soup completely, so there were still some chunks of bean and onion in there. Add 2 teaspoons of lime juice and you're done! We ate it with cheese, sour cream and cilantro.

This soup is very hearty (especially if you add sour cream) and flavorful, with just a little bit of spiciness. Plus it satisfies my neverending craving for Mexican food. I'll definitely be making this one a lot over the winter!

Sunday, October 20, 2013

Swatch: L'Oreal The Muse's Attitude

The polish in this post was purchased by me. All opinions are my own.

(Psst--have you entered the giveaway? It ends tomorrow night!)

Oh man, I've been a bad blogger this week, haven't I? I've actually been spending a lot of time on a super duper top secret project that I can't tell you about yet. ;-)

Here's a few pics of my current nails; I'm wearing L'Oreal The Muse's Attitude, which I also picked up at Rite Aid last week. It has a blackened base with a pretty green-to-teal shifting shimmer.

L'Oreal The Muse's Attitude. Two coats with Out the Door topcoat.


Pretty, no? This could be a nice Halloween polish if you're dressing as a witch maybe! I actually couldn't capture the full spectrum of the color shift--in normal indoor light this polish looks fully green with no blue undertones. I had no problems with application.

I grabbed The Muse's Attitude for $5.99 (11.7 ml) at Rite Aid!

The polish in this post was purchased by me. All opinions are my own.

Wednesday, October 16, 2013

Swatch: Revlon Wintermint

The polish in this post was purchased by me. All opinions are my own.

The other day I had a rare opportunity to go to Rite Aid, which has a much wider range of polish than my normal grocery store, so I was able to grab a Revlon polish from the new Parfumerie collection. As the name implies, these are scented polishes, and they come in these really cute bottles:


Wintermint is a seafoam green foil with tiny blue hexes, lots of gold shimmer, and I think I spotted some copper sparks in there as well.

Revlon Wintermint, two coats with Out the Door topcoat.

You might have noticed that Wintermint is very similar to the popular (and expensive) Deborah Lippmann Mermaid's Dream. I don't own Mermaid's Dream, so I can't compare them directly, but judging from pictures they are pretty close--Mermaid's Dream looks to be a touch more blue, and seems to have a bit more glitter. Wintermint also looks less bumpy than Mermaid's Dream. I can't call them dupes, but I certainly don't feel the need to own both!

Wintermint applied very nicely, and the glitter distributed itself evenly. Despite being a foil, it was easy to get nice thin, even coats. The texture is pretty smooth with topcoat. As for the scent, it smells like spearmint gum! The scent isn't strong (at least not under topcoat)--I generally have to get my hand pretty close to my face to smell it.

I think Revlon did a nice job with this polish. I'd like to go back and look at some more from this collection; I'm a sucker for smelly things!

I bought Wintermint for $5.99 (11.7 ml) at Rite Aid.

The polish in this post was purchased by me. All opinions are my own.

Monday, October 14, 2013

Today's mani: a mani of many names

Good evening everyone! I'm still fighting this cold (it's moved from my throat to my nose, ick) but I gathered the energy to do my nails today. I didn't have a very strong vision for how I wanted this to look; I just played around with doing little splotches of different colors in a vaguely gradient-like fashion (yellow-green in the middle and blue-green and black towards the edges).


Since I didn't know what to call this mani, I asked for help from my friends in the nail thread at Something Awful. Kirby at The Mercurial Magpie suggested "Rainbow Camo", while Andrea of Indigo Bananas preferred "Parrot in a Blender" (vivid imagery!). I also got the suggestions "Jumble in the Jungle" and "La Grande Jatte" after this pointillist painting.

What do you think? Does it remind you of anything?

Friday, October 11, 2013

Today's mani: falling leaves

Happy Friday! I have a cold right now. :-( But I still had the energy to do my nails today! I felt like having a fall-themed mani, since the leaves have really started to turn here. I also wanted to practice some freehanding.


The base color is Essie Armed and Ready (which has a nice gold shimmer in the bottle that's hardly visible on the nail). I painted on the leaves with Orly Sand Castle, Julep Minka and Julep Otte.

Is anyone else excited about fall? My favorite part of it is being able to get hot apple cider everywhere!

Wednesday, October 9, 2013

Swatch: Incoco Fright Night nail polish appliques

The product in this post was sent to me for review. All opinions are my own.

Good morning! Today I wanted to show you another set of nail wraps from Incoco's Fright Night collection. (Here's my other review from last week.) This pattern is also called Fright Night, and it features a haunted house and graveyard pattern over orange glitter!

Incoco Fright Night nail polish appliques, no topcoat.

As usual, these appliques were very easy to apply smoothly and remove, since they're made of nail polish and are quite stretchy--none of them tore while I was stretching them either. Definitely recommended if you're looking for an easy but intricate Halloween mani!

You can buy Fright Night at incoco.com ($8.99 for 16 double-ended strips). You can also follow Incoco on Facebook, Twitter, Pinterest and Instagram!

The product in this post was sent to me for review. All opinions are my own.

Monday, October 7, 2013

Visit to the New England Aquarium

Hey all! This weekend my parents came to visit us, and we took a trip to the New England Aquarium in Boston. This place is definitely worth a visit if you're interested in nature at all--it has a ton of exhibits with a huge variety of species! I took a bunch of pictures there and I thought I'd post some of them for you.

Hey there.

Several of the pics are unfortunately blurry because those darn animals just wouldn't stop moving to pose for me! But I hope you like them anyway. There are a lot, so I'll put them after the jump...

Six-month bloggiversary giveaway!!

Well, dear readers, today my blog has been alive for exactly six months. The time has gone by so quickly! I'm so grateful for everyone who's followed, liked and left comments. And to show my gratitude, I'm having a giveaway!!

The prize has been generously donated by Andrea at Indigo Bananas, which is fitting, since my very first blog post was a review of her polish Anansi (still one of my favorites!). Indigo Bananas is becoming well-known throughout the indie polish world for beautiful glass fleck, multichrome and holographic polishes. And now she's making glow-in-the-dark polish too!


That's right, the winner will get their choice of two polishes from Indigo Bananas' new collection! Here are descriptions of each polish (visit her Etsy shop to check out swatches):
  • Medusa Transducer: charcoal jelly with orange-gold-green shifting iridescent glitter, a mix of microshimmers, and glows teal in the dark!
  • Enchante: red jelly with black glitter, glows blue in the dark
  • The Secret to Life:  dark purple jelly filled with a complex mix of flakies - pink, purple, silver, blue predominantly are visible, along with larger (real) silver flakies and violet iridescent shreds that shift color from green-blue to blue to violet
  • Moonlight (Clair de lune): real silver flakie based polish that has purple, black and holographic microglitter
  • Earthshine (Clair de terre): dark green jelly polish packed with many types of shimmer, flakies and glass fleck pigments. Larger silver flakes are interspersed with pink, blue, black, violet, red, gold and silver flakies
  • Wise Up, Janet!: glass fleck based linear holographic polish that is lavender leaning lilac with a strong silver flash to it
  • Great Scott!: medium blue heavy fleck polish with strong green-gold shimmer, and scattered holographic microglitter, glows strongly blue in the dark
  • Hope: released for breast cancer awareness month, a linear holographic pink polish with subtle pink/gold shimmer
  • Lime Warp:  bright, lime green glass fleck shimmer, with scattered holographic microglitter, that grows a bright green in the dark
  • green, teal, and blue glow-in-the-dark topcoats!

Now for the nitty gritty: the giveaway is open internationally. You have to give your email address to enter (so I can contact you if you win!), but all other entries are optional. The winner will have 48 hours to get back to me, otherwise I'll choose a new winner. All entries will be verified, so no cheating!

Giveaway ends on October 21 at midnight (EST)! Good luck!!

a Rafflecopter giveaway

Friday, October 4, 2013

Swatch: Indigo Bananas Immortal Game

The polish in this post was purchased by me. All opinions are my own.

Today I've got some pics of an Indigo Bananas polish that came out this summer in the Fiery the Angels Fell collection (inspired by Blade Runner). Immortal Game is a teal crelly with pink-to-gold shifting glass flecks, plus some purple flecks and holo microglitter. My pics really don't do this polish justice--the pink shimmer is way more prominent to the eye than it seems here. It's mesmerizing to look at!

Indigo Bananas Immortal Game, two coats, plus Out the Door topcoat.

It was tricky to capture the gold color shift, but I got a little bit of it here:


The formula, as usual, was lovely and easy to use. And I only needed two coats! Teal is, of course, one of my favorite colors, so I'm gonna be wearing this for as long as possible (good thing Indigo Bananas polishes tend to wear like iron!).

By the way, there's another reason why I'm showing you an Indigo Bananas polish right now, but you'll have to check back on Monday to find out why. ;-)

Immortal Game is available at Indigo Bananas' Etsy shop ($10 for 15 ml or $6.25 for 8 ml); she ships internationally! You can also find Indigo Bananas on Facebook and Instagram

The polish in this post was purchased by me. All opinions are my own.

Wednesday, October 2, 2013

Swatch: Incoco Bone Rattling nail polish appliques

The product in this post was sent to me for review. All opinions are my own.

Is anyone getting excited for Halloween yet? This is the first year we might get trick-or-treaters coming to our door, and I can't wait!

If you're already thinking about your Halloween mani, check out these creepy-yet-cute appliques from Incoco's new Fright Night collection! They're made of nail polish and are very stretchy, so they're easy to put on and remove. (For an in-depth review, read my first Incoco post.)

Incoco Bone Rattling nail polish appliques. No topcoat.

Like previous Incoco nail polish appliques I've tried, the Bone Rattling wraps applied nicely with no wrinkles thanks to their stretchiness. It might be my imagination, but I think these were a little more resistant to tearing than the earlier ones--maybe they've tweaked the formula? The one issue I had was that occasionally the strips didn't want to stick on the corners of my nails. For that reason I added topcoat after I photographed my nails, even though you're not supposed to need topcoat with these.

Oh, and did I mention they glow in the dark??


Spooooky! You do have to charge these immediately beforehand, or the glow will be weaker. I had my nails under a bright light while swatching, and then took this pic, but twenty minutes later (after sitting in normal indoor light) I went back into a dark room and they weren't glowing as much.

Bone Rattling appliques are available (along with five other Halloween patterns) at Incoco.com for $9.99. You can also follow Incoco on Facebook, Twitter, Pinterest and Instagram!

The product in this post was sent to me for review. All opinions are my own.

Tuesday, October 1, 2013

31-Day Challenge #31: honor nails you love

Well, I made it...the final day of the 31-Day Challenge! I almost can't believe I managed to do 31 manis in a row. There were definitely some days when I really didn't feel like painting my nails, but in the end I'm glad I stuck it out. This month I tried several techniques for the first time and expanded my repertoire of nail art by quite a lot; I also discovered many great blogs to follow! I'm looking forward to doing the challenge again next year (but not before, heh!).

The final prompt is "honor nails you love". I think my favorite nail art blogger has to be Chalkboard Nails; she has impeccable technique, her nails always look fantastic, plus she takes perfect photos! I decided to reproduce her metallic mani from Day 8 of this challenge. When I saw her pictures, I thought, "whoa, how did she do that??" but it turned out to be very simple! (The best kind of nail art!)


Instead of a gradient, I randomly sponged on several metallic polishes for the base color. (I think it turned out a little too subtle.) I used China Glaze Swing Baby, Sephora by OPI I Only Shop Vintage, Revlon Enthrall, Hard Candy Crush on Tin, and OPI The World is Not Enough. For the "distressed" effect I applied Revlon Stiletto after wiping most of the polish off the brush.

I made another collage for the final third of the challenge. Click to see my previous manis!


Image Map

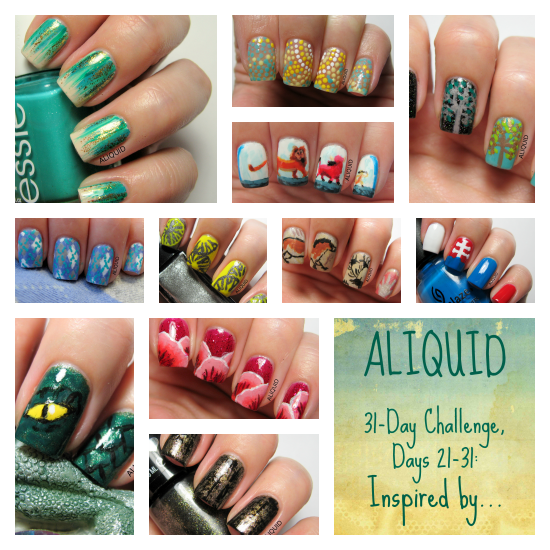
I also thought I'd be slightly vain for a moment and pick the challenge manis I'm most proud of. I think my top three would have to be:


#21 Inspired by a Color--my version of a waterfall mani. I just think it turned out really pretty, and apparently it's my #1 challenge mani among visitors to the blog!


#23 Inspired by a Movie--probably my best freehand effort so far. It's not perfect, but it makes me smile!


#30 Inspired by a tutorial--one-stroke flowers. The one-stroke technique is one I've been interested in for a long time, but never managed to get right until this time.


OK, that's all, folks. Now I'm off to give my nails a break for a few days. :-D Don't forget to check out the final challenge posts from all these other lovely ladies! (And thanks again to More Nail Polish for organizing the linkup!)