Yep, another cooking post this week! Mr. ALIQUID has the week off from work, so we decided to mix it up a little with our dinner plans (normally we have very similar dinners from week to week). My craving for Mexican food hit me again, so I made nachos! I got the basic procedure from my dad, who's been making awesome nachos for years.
Nachos are one of those great dishes that you can make virtually any way you want as long as you keep the basics the same: chips + toppings + cheese. Here's what I did...
I heated up a mix of refried black and pinto beans (plus a little water) on the stovetop and added a packet of taco seasoning; if you want to avoid the prepackaged stuff, I imagine a blend of chili powder, cumin, garlic powder and salt would do the trick. You can of course use any combo of meat, beans and rice for your topping, just make sure the meat is fully cooked before you put it on your nachos. About 1 to 1.5 pounds of topping should be enough.
I put down a layer of corn chips on a large rimmed baking sheet; make sure to fill in all the gaps, but don't overlap them too much or you'll end up with the dreaded topping-less chip. Then I added my beans on top. Don't be too heavy-handed with this part, or the chips will get soggy and collapse under the weight.
I sprinkled chopped onions and cherry tomatoes all over, plus fresh jalapenos on my husband's half (I'm still a wuss). Finally, the cheese! I used a whole two-cup bag of shredded "Mexican blend" cheese.
Stick the nachos in the oven at 325 degrees for about 20 minutes. This will melt the cheese, soften the veggies and remove sogginess from the toppings and chips. One large tray will feed four regular people or two very hungry people!
We ate our nachos with homemade guacamole (just avocado, onions, tomatoes, cilantro, lime juice, salt and pepper). Oh so delicious...
Tuesday, March 4, 2014
Monday, March 3, 2014
Swatch: Glitter Daze Poised
The product in this post was purchased by me. All opinions are my own.
Happy Monday! Recently I placed an order at Glitter Daze, since they're celebrating their two-year anniversary (yay!). I got two polishes plus a free chocolate sucker and fizzy hand soak (which I'll review sometime in future). One of the polishes I grabbed is Poised, which I've had on my wishlist for a long time.
Poised is a dusty pale orchid with coppery, gold and some green flecks. It's shimmery and beautiful...check it out!
I love this polish...it's so soft and romantic! Work-appropriate but still interesting to look at. As you can see, it's quite sheer--even at three coats there's still some visible nail line, although on shorter nails it would look opaque. I had no complaints about the formula or dry time.
Poised is available at Glitter Daze's shop ($11 for 15 ml), although it's currently out of stock. It looks like their special anniversary freebies are still going on, so you should definitely go grab some gorgeous polishes!
The product in this post was purchased by me. All opinions are my own.
Happy Monday! Recently I placed an order at Glitter Daze, since they're celebrating their two-year anniversary (yay!). I got two polishes plus a free chocolate sucker and fizzy hand soak (which I'll review sometime in future). One of the polishes I grabbed is Poised, which I've had on my wishlist for a long time.
Poised is a dusty pale orchid with coppery, gold and some green flecks. It's shimmery and beautiful...check it out!
![]() |
| Glitter Daze Poised. Three coats with Out the Door topcoat. |
I love this polish...it's so soft and romantic! Work-appropriate but still interesting to look at. As you can see, it's quite sheer--even at three coats there's still some visible nail line, although on shorter nails it would look opaque. I had no complaints about the formula or dry time.
Poised is available at Glitter Daze's shop ($11 for 15 ml), although it's currently out of stock. It looks like their special anniversary freebies are still going on, so you should definitely go grab some gorgeous polishes!
The product in this post was purchased by me. All opinions are my own.
Labels:
copper,
glass fleck,
Glitter Daze,
gold,
nail polish,
purple,
review,
shimmer,
swatch
Sunday, March 2, 2014
I made food: cranberry banana bread
On Friday I decided to surprise my husband by baking something for him. Friday is his toughest day at work, and we had run out of ice cream to eat for dessert, so I knew he'd appreciate something sweet! We had two spotty brown bananas left, so of course I thought of banana bread.
I got this recipe a long time ago from a grad school colleague. It makes perfectly moist, sweet bread, and it's incredibly easy. Give it a try sometime!
Ingredients:
Preheat the oven to 350 degrees. Whisk together the flour, salt, baking soda and baking powder.
In a separate bowl, cream together the butter, brown sugar and white sugar. Then beat in the dry ingredients.
Mix together the eggs, bananas and any mix-ins, then fold into the rest of the batter until just combined (you want to stir the batter as little as possible).
Butter up your loaf pan (or if, like me, you can't find your loaf pan, any bread-shaped dish) and pour in your batter. Stick it in the oven for 50-60 minutes.
While you're waiting, feel free to lick the bowl.
The bread is done when a toothpick inserted in the middle comes out clean. Try to resist eating it until it cools down a little!
I got this recipe a long time ago from a grad school colleague. It makes perfectly moist, sweet bread, and it's incredibly easy. Give it a try sometime!
Ingredients:
- 1 1/3 cups all-purpose flour
- 1/2 tsp. salt
- 1/2 tsp. baking soda
- 1/4 tsp. baking powder
- 5 1/3 tbsp. unsalted butter
- 1/4 cup brown sugar
- 1/3 cup white sugar
- 2 eggs
- 2 very ripe bananas, mashed
- optional: 1/2 cup mix-ins, like chocolate chips, nuts, etc. I used craisins to add some tartness
Preheat the oven to 350 degrees. Whisk together the flour, salt, baking soda and baking powder.
In a separate bowl, cream together the butter, brown sugar and white sugar. Then beat in the dry ingredients.
Mix together the eggs, bananas and any mix-ins, then fold into the rest of the batter until just combined (you want to stir the batter as little as possible).
Butter up your loaf pan (or if, like me, you can't find your loaf pan, any bread-shaped dish) and pour in your batter. Stick it in the oven for 50-60 minutes.
While you're waiting, feel free to lick the bowl.
![]() |
| "Hmm, maybe if I lie down very nicely, I'll get a little batter too..." |
![]() |
| "SCORE!!" |
The bread is done when a toothpick inserted in the middle comes out clean. Try to resist eating it until it cools down a little!
Labels:
banana bread,
bananas,
cake,
cranberries,
dessert,
food
Saturday, March 1, 2014
2014 Blogger Challenge #5: Tools of the Trade
Happy Saturday! Today's 2014 Blogger Challenge theme is, believe it or not, nails! Oh no, what should I write about?? I decided that instead of doing another swatch or something, I'd write about all the other stuff I use to take care of my nails and do nail art. Somehow I've never discussed this topic before! I'll also leave links to purchase any of the products I use, in case you're interested.
Check out my enormous bottle of Out the Door! I need it too, since I burn through the stuff. It's not quite as quick-drying as Seche Vite, which I used for a while, but Seche caused my nail polish to pop off in sheets, while Out the Door doesn't. Plus, OtD doesn't smell like death. (buy it here
)
For a base coat, I use NailTek Foundation II about 99% of the time. It's been a big help in strengthening my nails over the past year or so. I rarely get breaks now, even with square nails. It's also a ridge-filler, which is great for my ridge-y nails; it covers up all but the worst ones. (buy it here
)
I sometimes use Gelous as a topcoat over really bumpy glitter polish, since it's thick and also ridge-filling. It's also great as a base coat when you need super smooth nails, like when you're putting on a chrome polish. (buy it here
)
My polish remover of choice is Zoya Remove+. It's nearly as strong as pure acetone but WAY less drying. (I was stuck using pure acetone for a while and my cuticles looked absolutely horrible.) It doesn't smell quite as ghastly either. The only downside is the price. (buy it here)
I use OPI polish thinner when a polish is too gloopy, or if I'm doing nail art and I need a polish to apply more like a paint. I also use it when making polish. This thinner is pure butyl acetate and ethyl acetate, so no sketchy ingredients that will wreck your polish. (buy it here
)
Here's my cleanup brush! It's actually an E.L.F. Professional Concealer Brush, but it's got the perfect shape and stiffness for cleaning up stray polish (which I really need, since I always rush through application). I've been using this guy for over a year, and you can see it's getting a little worn out, but still works great. Actually it's deformed into a shape that works even better! (buy it here
)
I hope that wasn't terribly boring! What nail care or nail art product could you never live without?
1. Base and top coats
Check out my enormous bottle of Out the Door! I need it too, since I burn through the stuff. It's not quite as quick-drying as Seche Vite, which I used for a while, but Seche caused my nail polish to pop off in sheets, while Out the Door doesn't. Plus, OtD doesn't smell like death. (buy it here
For a base coat, I use NailTek Foundation II about 99% of the time. It's been a big help in strengthening my nails over the past year or so. I rarely get breaks now, even with square nails. It's also a ridge-filler, which is great for my ridge-y nails; it covers up all but the worst ones. (buy it here
I sometimes use Gelous as a topcoat over really bumpy glitter polish, since it's thick and also ridge-filling. It's also great as a base coat when you need super smooth nails, like when you're putting on a chrome polish. (buy it here
2. Application tools
My polish remover of choice is Zoya Remove+. It's nearly as strong as pure acetone but WAY less drying. (I was stuck using pure acetone for a while and my cuticles looked absolutely horrible.) It doesn't smell quite as ghastly either. The only downside is the price. (buy it here)
I use OPI polish thinner when a polish is too gloopy, or if I'm doing nail art and I need a polish to apply more like a paint. I also use it when making polish. This thinner is pure butyl acetate and ethyl acetate, so no sketchy ingredients that will wreck your polish. (buy it here
Here's my cleanup brush! It's actually an E.L.F. Professional Concealer Brush, but it's got the perfect shape and stiffness for cleaning up stray polish (which I really need, since I always rush through application). I've been using this guy for over a year, and you can see it's getting a little worn out, but still works great. Actually it's deformed into a shape that works even better! (buy it here
3. Nail art tools
Here's my cute little folder full of brushes and dotters. This actually contains brushes from multiple kits; the folder came with a lot, but I added a set of tiny acrylic paintbrushes for detail work, plus some other random stuff. I definitely have some favorite brushes and some not-so-favorite ones. (buy the folder kit here
and the small brushes here
)
And of course my trusty stamper and striping tape. I've got a Konad stamper, but I'm also hoping at one point to get a "squishy" stamper too. For a scraper I just use an old credit card. (buy the stamper here and the tape here
)
4. Nail care
This is actually the most crucial category if you want nice-looking nails (and who doesn't?). Keeping your cuticles moist not only helps their appearance, but also helps your nails grow in stronger and healthier. When shopping for cuticle moisturizers, avoid products that contain water, since water is your nails' worst enemy!
I keep Indigo Bananas cuticle balm in my bedroom to wear overnight. (My tin is actually a prototype, but now she sells larger sizes with different scents!) On my desk where I do my nails I keep Julep's cuticle oil, in case I need to freshen up before I take photos. (buy Indigo Bananas balm here; it looks like Julep's cuticle oil is no longer available in this form, but they have a couple similar products)
To keep my cuticles neat I use Sally Hansen Instant Cuticle Remover. This stuff is powerful--you leave it on for 15 seconds, then push and rub at your cuticles with an orange stick. This may be gross, but I love seeing the bits of dead skin coming off...it beats using nippers anyway! (buy it here
)
I hope that wasn't terribly boring! What nail care or nail art product could you never live without?
Friday, February 28, 2014
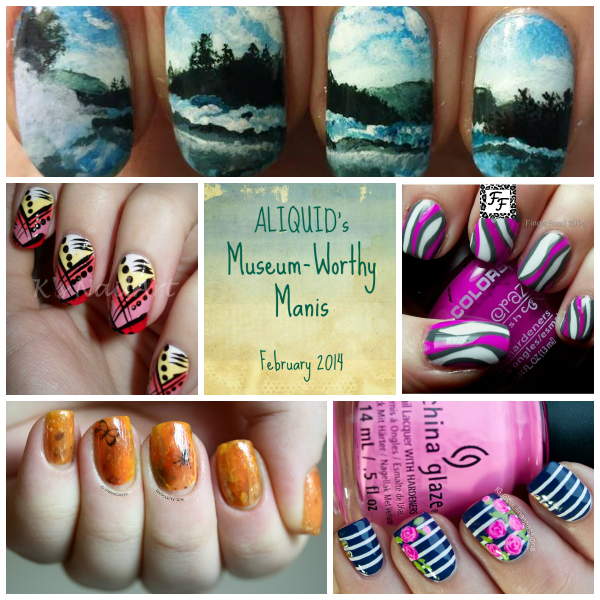
February's Museum-Worthy Manis!
It's the last day of February, and I'm so looking forward to March and finally seeing our snow melt! Today I'm continuing with my Pinterest picks of the month by showing you some awesome nail art I pinned in February. Please go visit all of these amazing artists and like/follow/etc.!
1. Landscape (Based on a Photo by Carl Heilman) - Nails by CTC
I stumbled across Nails by CTC's Facebook page this month and was absolutely astounded by the work she does. Her page is just photo after photo of gorgeous art like this. I don't know how she manages to get such photorealistic art on such tiny canvasses! She deserves a million bajillion likes.
2. Abstract - K's NailArt
This one reminds me of a tropical sunset! The black details have such great movement--they feel like palm trees swaying in the breeze. I love that such a simple set of colors, lines and dots can result in something so interesting to look at. Go read more at K's NailArt!
3. Tri-Polish Challenge - FingerFood
Not only is FingerFood the organizer of the nail art challenge I'm doing right now, but she's an amazing nail artist too! This is the latest of many manis I've pinned from her. I'm a sucker for bright colors contrasting with neutrals, and I love the funky freeform patterns here. Not to mention I'm jealous of her perfect freehanding!
4. Amber Resin Nail Art - Manicurity
OK, this one's not brand new, but I discovered it this month while Googling for "amber". If these nails weren't attached to someone's fingers, I would have thought they were real amber! They're so painstakingly detailed but still manage to look natural. I'm so jealous, because I've always struggled to embrace randomness in my nail art. The bugs are a perfect finishing touch too! Read more at Manicurity!
5. Nautical Rose Nails - Paulina's Passions
Sometimes there's nothing like an old-fashioned floral mani. I love the contrast between the masculine nautical stripes and gold studs and the delicate pink roses. Everything about this mani is so clean; it just satisfies my constant craving for neatness! Check it out at Paulina's Passions!
Well, that's all from me for this month! I'll be back tomorrow with a new 2014 Blogger Challenge post!
Thursday, February 27, 2014
February's Gimme That Polish!

It's new feature time here at ALIQUID! If you follow me on Pinterest, you know that I'm constantly pinning swatches of polishes I'm lusting after. (My wishlist is currently about 50% larger than my actual stash...) I decided it would be fun, at the end of each month, to pick my top five lemmings from that month and share them with you! You can click on any of the images in the collage above or keep reading to find out about each polish. Make sure to give the original swatchers some love! Let's get started!
1. Emily de Molly - Turbulence
This isn't a new polish, but it's new to me. Why must these Australian indies keep torturing me with such amazing stuff?? Just look at it, a blue jelly (already +1 in my book) packed with sparkly holographic goodness. I have so many EdMs on my wishlist now! Check out the great swatches by It's All About the Polish and Emily de Molly's shop!
2. I Love Nail Polish - Nostalgia (H)
Yep, I'm still a sucker for those ILNP ultrachromes, despite owning two already. Nostalgia is a newer one, and this version has the added holographic finish. Unnnhhh, color shift... (Here are more swatches by Nailz Craze, and the ILNP shop.)
3. Zoya - Dillon
Zoya remains the master of the glass fleck. I want all of the glass flecks from the spring Awaken collection (except that yellow one, would NOT look good on me), but this seafoam green fellow is just calling my name. Polish Hound has gorgeous swatches of all of them!
4. Glam Polish - Spectral
OK let's be honest, I need the entire Supernatural collection from Glam Polish. Jewel tones with shimmer, flakies and holo glitter? GIMME GIMME GIMME. Another seductive Aussie brand!! Here are Work Play Polish's delicious swatches and Glam's shop (they ship to the US, it's just pricey!).
5. Nail Pattern Boldness - Intoxicated
When I wear glitter, I don't like mucking about with layering and all that nonsense. I want full coverage, dammit! Well, Nail Pattern Boldness' Parliament of Magpies collection gets my thumbs-up in that department. I just love the intricate pattern formed by those tiny glitters. I need, like, half this collection right now (despite the prospect of removing all that glitter). Check out Accio Lacquer's fabulous swatches and NPB's shop!
I hope you're lusting after all of these now too! I'll be back tomorrow with my top nail art from February! Don't forget to follow me on Pinterest!
Wednesday, February 26, 2014
Swatch: Zoya Cosmo
The product in this post was purchased by me. All opinions are my own.
I know I just swatched a Zoya a few days ago, but I had to do another one today. Texture plus holographic? Yes please!! Cosmo is a new addition to the PixieDust lineup: a silver textured polish loaded with two sizes of silver holographic hex. Behold...
Cosmo is one of the bling-est (blingiest? most bling-y?) polishes I've ever worn. My photo really does not do it justice. It looks like crushed diamonds!
I saw that other bloggers had nitpicks about the formula, but for me it was perfect: the glitters distributed themselves evenly with no effort from me, and the polish applied so neatly that I barely had to do any cleanup. It dried a little slower than other PixieDusts I've tried, probably due to all the glitter, but still within acceptable limits for me.
As for the texture, it's definitely a bit bumpier than your average textured polish, so if you weren't a fan of texture to begin with, Cosmo probably won't win you over. It's not snagging on my clothes or anything though.
You can of course add topcoat if you want a smooth polish, but it'll take some work. This is Cosmo with two layers of topcoat (still a bit bumpy):
Last but not least, the obligatory blurry sparkle shot:
Cosmo is available at zoya.com ($10 for 15 ml)!
The product in this post was purchased by me. All opinions are my own.
I know I just swatched a Zoya a few days ago, but I had to do another one today. Texture plus holographic? Yes please!! Cosmo is a new addition to the PixieDust lineup: a silver textured polish loaded with two sizes of silver holographic hex. Behold...
![]() |
| Zoya Cosmo. Two coats, no topcoat. |
Cosmo is one of the bling-est (blingiest? most bling-y?) polishes I've ever worn. My photo really does not do it justice. It looks like crushed diamonds!
I saw that other bloggers had nitpicks about the formula, but for me it was perfect: the glitters distributed themselves evenly with no effort from me, and the polish applied so neatly that I barely had to do any cleanup. It dried a little slower than other PixieDusts I've tried, probably due to all the glitter, but still within acceptable limits for me.
As for the texture, it's definitely a bit bumpier than your average textured polish, so if you weren't a fan of texture to begin with, Cosmo probably won't win you over. It's not snagging on my clothes or anything though.
You can of course add topcoat if you want a smooth polish, but it'll take some work. This is Cosmo with two layers of topcoat (still a bit bumpy):
![]() |
| Zoya Cosmo. Two coats with Gelous and Out the Door topcoats. |
Last but not least, the obligatory blurry sparkle shot:
Cosmo is available at zoya.com ($10 for 15 ml)!
The product in this post was purchased by me. All opinions are my own.
Labels:
glitter,
holographic,
nail polish,
review,
silver,
swatch,
textured,
Zoya
Subscribe to:
Posts (Atom)