


Showing posts with label grey. Show all posts

Monday, February 8, 2016

Swatch: Illamasqua Raindrops

The product in this post was purchased by me. All opinions are my own.

Hi gang! How are you doing? We both had a snow day today, although the storm turned out to be much less terrible than expected. Overall, this winter has been so much nicer than last year here in Boston! (That was by far the worst winter I've ever experienced!!)

Today I want to show you the polish I wore last week. Illamasqua Raindrops is, I believe, pretty famous in polish land. I grabbed it when they were having a sale recently (I never would have paid full price, way too expensive!). It's a pale blue-toned grey crelly with white glass flecks. Despite the name, it reminds me more of snow than rain!


Illamasqua Raindrops. Three coats with Out the Door topcoat.

The formula was on the runny, sheer side. I needed three coats for opacity. I also ended up with flooded cuticles, so apply carefully! I have to say that this polish had some pretty great wear time--normally I get chips within a day or two, but this stuff kept plugging along all week with just some tipwear! I don't know if that's typical of Illamasqua's formula, but I like it!

You can get Raindrops at Illamasqua.com (they ship to the US).

Have a great week!

The product in this post was purchased by me. All opinions are my own.

Monday, June 22, 2015

Swatch: Three new Femme Fatales

The products in this post were purchased by me. All opinions are my own.

Happy Monday everyone!

So after being in the nail polish game for a while now, it takes a lot for a new polish to really wow me, much less an entire collection. But lately I've been absolutely drooling over everything Femme Fatale has released! That's why I had to break my no-buy for Color4Nails' latest restock and grab some of Femme Fatale's newest polishes. I've managed to get three swatched for you, go me!

All of these had a great formula and stayed exactly where you put them. The only negative was that, since they have sheer bases, I got some bald spots on my tips. But honestly I didn't care!

First up is Lantern Waste. This has a dark slate grey base with orange-to-green flakies and red-to-gold shifting shimmer!


Femme Fatale Lantern Waste. Two coats with Out the Door topcoat.

This has such a creepy vibe! Despite the strong shimmer, it wasn't brush-strokey at all.


Next is Heart's Desires. It has a dusty rose base with green-to-blue flakies and lots of copper holo microglitter.


Femme Fatale Heart's Desires. Three coats with Out the Door topcoat.


I love the way this polish takes a "grandma" color and makes it exciting again!


Last but not least, I have Mirror, Mirror, On the Wall... I was so happy to get this one because I missed the first two restocks and was terrified that I'd missed it forever. When I first saw the swatches, I wrote that it looked like a polish a unicorn would wear, and I still think that's true! It has a very pale turquoise base with pink-to-gold shifting shimmer and lots of silver holo glitter.

The shimmer was so strong in my normal lighting that it freaked out my camera, so I got some natural light shots. I love how different it looks at various angles!


Femme Fatale Mirror, Mirror, On the Wall... Three coats with Out the Door topcoat.


There's definitely a touch of magic in that bottle, don't you think? The polish was pretty smooth after one coat of topcoat.


Well, are you as in love with these Femme Fatales as I am? If you want to grab one, keep a close eye on the Femme Fatale shop and/or their stockists, because I'm sure they've been selling out really quickly!

The products in this post were purchased by me. All opinions are my own.

Friday, January 16, 2015

Today's mani: Reciprocal gradient with A England

Happy Friday!! Today I tried out a reciprocal gradient inspired by some of the manis at Simply Nailogical. She does some amazing stuff with gradients!

Unfortunately the colors I used weren't different enough to make the pattern as visible as I wanted. But in real life my nails still look pretty cool and subtle. I will definitely have to do this one again!


The polishes I used were A England Ascalon, Sleeping Palace and Briarwood. In case it's not clear what I did, I started by doing a gradient of all three, let that dry, then put down Scotch tape in triangle shapes and did another gradient going in the opposite direction.

Friday, January 9, 2015

Swatch: Blue-Eyed Girl Lacquer Spark in the Dark collection & Siren LE

The products in this post were sent to me for review. All opinions are my own.

Happy Friday! Today I'm excited to show off an upcoming collection from a new-to-me indie brand, Blue-Eyed Girl Lacquer! I was so honored that Julie asked me to review for her!

The Spark in the Dark collection is perfect for winter because it's full of different shades of blue, which made me really happy! Of course, blues are the hardest shades to photograph, so I had to color-correct some of these, and the colors still might not be 100% accurate. So I would definitely look for multiple swatches before purchasing if that concerns you!

A note on the formula: the brand states that their polishes are "designed to be opaque in one to two coats, so they may need to be thinned to your desired consistency." I found that they were definitely on the thicker side but still perfectly workable, so long as I was careful to wipe a lot of excess polish off the brush. I didn't feel the need to add thinner to any of them, but that's just my preference!

OK, let's start with an LE polish called Hypothermia! This polish will ONLY be available if you purchase the entire collection. It's described as a purple holo with purple shimmers, although to me the base color is more like faded indigo.


Blue-Eyed Girl Lacquer Hypothermia. One coat with Out the Door topcoat.


The purple shimmers were hard to catch on camera, but they're definitely there in real life. The holo effect is nice and strong. This polish was a great one-coater!


Next is Bound to the City Life, a dark teal jelly with multicolored holo microglitter. It has great depth and sparkle!


Blue-Eyed Girl Lacquer Bound to the City Life. Two coats with Out the Door topcoat.


Since this is a jelly, it was thicker than the others and took a little more finesse to apply evenly. I didn't find it unpleasantly goopy or sticky though. 


This is Counting Down Until I See You, which has a clear base packed with pink microglitter, as well as some larger pink glitter, gunmetal grey glitter, and silver reflective beads. Definitely the blingiest member of the collection!


Blue-Eyed Girl Lacquer Counting Down Until I See You. Two coats with Out the Door topcoat (left) and Revlon matte topcoat (right).
  

Since this one's very sparkly, I added matte topcoat to my ring and pinky nails so you can see the details a little better. (Plus I think it looks great matte!) The glitter applied very evenly, and two coats was sufficiently opaque for my taste. 


Next up is It's Almost After Midnight, a smoky dark grey with strong blue shimmer. This is definitely one of my favorites in the collection--it's so moody!


Blue-Eyed Girl Lacquer It's Almost After Midnight. Two coats with Out the Door topcoat.
  

This polish was sheer on the first coat but built up well on the second. I couldn't stop staring at my nails. :-D 


Here's Never Danced Like This Before, a navy holo with teal shimmer. It's gorgeous, with a jeweltone-like quality to it.


Blue-Eyed Girl Lacquer Never Danced Like This Before. One coat with Out the Door topcoat.


This was another one-coater. I'm really impressed with how she manages to get such depth and opacity in a polish at the same time! The holo particles here are a little bigger and less dense than in Hypothermia.


Next is She's Electricity, a hot pink holo with pink and aqua shimmers and purple-blue iridescent microglitter. This one feels like a splash of summer in amongst all the blues!


Blue-Eyed Girl Lacquer She's Electricity. Two coats with Out the Door topcoat.


The extra shimmers and glitter are visible, but they don't pop out quite as much as I was hoping. Maybe if I added some thinner? The holo effect here is the weakest of the three holos in the collection. 


Next up is The Years Have Been Short, which is a slightly white-tinted base with blue, white and iridescent microglitters, blue shimmer, and silver reflective beads. This polish just screams "snowstorm" to me!


Blue-Eyed Girl Lacquer The Years Have Been Short. Two coats with Out the Door topcoat.
  

Again, the glitter applied very evenly and I was happy with the opacity at two coats. I think this would also look nice layered! 


Finally, here's Wanna Fall in Love Tonight, a red-toned purple with golden red shimmer. This dries to a semi-matte finish, so I've left it au naturale on the two left fingers and added topcoat on the two right fingers. (Pardon my huge nail ridges!)


Blue-Eyed Girl Lacquer Wanna Fall in Love Tonight. One coat with Out the Door topcoat (ring and pinky fingers).


Although my nail line is visible here, I couldn't really see it in normal lighting. I probably could've gone for two coats though. As you can see, the shimmer is very fine and adds a luminous quality to the polish. 


In addition to the Spark in the Dark collection, I also received a limited edition polish in the Siren Series, which will only be restocked once. Sirens Are Made For Water, Not Snow is a blue creme with a purple flash that dries semi-matte. As above, I added topcoat only to the ring and pinky nails.


Blue-Eyed Girl Lacquer Sirens Are Made For Water, Not Snow. One coat with Out the Door topcoat (ring and pinky fingers).
  

I was a bit disappointed to find that the purple shimmer is much weaker on the nail than in the bottle. (My camera couldn't pick it up at all because it was confused by all the blue.) This might be another case where adding thinner could help.


Overall, I think this is a really solid collection, especially with all those gorgeous blue polishes! My favorites would have to be It's Almost After Midnight, Never Danced Like This Before, and The Years Have Been Short. Which do you like best?

All these polishes will be released on January 12 at Blue-Eyed Girl Lacquer's shop! You can get the entire eight-piece Spark in the Dark collection for just $67 (13 ml size) or $37 for minis.

Be sure to follow Blue-Eyed Girl Lacquer on Facebook, Instagram, Twitter and Pinterest to stay up-to-date!  

The products in this post were sent to me for review. All opinions are my own. 

Sunday, September 14, 2014

Swatch: LynB Designs Double Bluff

The product in this post was purchased by me. All opinions are my own.

Hi all! I didn't realize it's been a week since I last posted--this week has really flown by! I put the finishing touches on my next ALIQUID Lacquer collection, so you'll be seeing that soon!

Today I have one of my newest acquisitions from an indie brand I'd never tried before. This is LynB Designs Double Bluff, which comes from the collection inspired by the British TV show Qi (short for Quite Interesting)! I looooove this show, and if you like interesting factoids and funny people, you will too! (It's on YouTube, shhhh!)

Double Bluff is a metallic grey linear holo with a strong reddish-purple shimmer. Very sexy!


LynB Designs Double Bluff. Two coats with Out the Door topcoat.


The formula was on the thick side, but I didn't have any problems getting it to level out. It is pretty sheer--I think if my nails were longer I'd probably need three coats. The holo effect isn't ultra strong, but strong enough to still be visible indoors.

I think this is actually a great fall/Halloween polish. The shimmer makes it look slightly eerie, don't you think?

The product in this post was purchased by me. All opinions are my own.

Sunday, August 10, 2014

Swatch: Mentality Gale

The product in this post was purchased by me. All opinions are my own.

Happy Sunday everyone! Before I show you today's mani, I just want to point you to my brand new storefront! It comes with a rewards system I call Pooch Points, meaning you can start earning discounts when you shop there! You also may have noticed that the URL of the blog has changed--if you find any broken links around the site, please let me know!

OK, on to my mani! I was so busy last week that I didn't get to do my nails at all until Friday. It feels good to have polish on again! I'm wearing Mentality Gale, a new acquisition. Mentality makes amazing matte polishes, so I had to grab a couple when they were having a sale!

Gale is a matte polish composed of tiny flecks of grey and red, which give the polish a slightly purple tone.


Mentality Gale. One coat.


The polish was nicely opaque in one coat! The formula was on the thick side, but not annoyingly so. I tried to minimize the number of strokes on each nail to avoid brushstrokes, because the particles in this one are prone to showing everything the brush does. Dry time was pretty quick.

I'm not seeing Gale on Mentality's site right now, so I'm not sure if it's still available. But they have plenty of other beautiful matte polishes for sale!

The product in this post was purchased by me. All opinions are my own.

Saturday, June 28, 2014

The Neverending Pile Challenge: Revlon Naughty

The product in this post was purchased by me. All opinions are my own.

Happy weekend! This weekend is special for us because tomorrow is our first anniversary. We're going out to eat a giant steak dinner, so I'll make sure to post pics on Instagram and make you all jealous!

Today's Neverending Pile theme is dirtiest-named polish. Sadly I don't have a whole lot of polish with dirty names; the worst I've got is Revlon Naughty. I think the name fits the polish pretty nicely!


Revlon Naughty. Two coats with Out the Door topcoat.


Naughty has a smoky brownish-grey base with a sexy purple glow. Definitely quite sultry! The formula was OK--too runny for my taste, streaky on the first coat but evened out on the second. I did get some minor bubbling too. In indoor lighting the shimmer gets hidden a bit.

What's YOUR dirtiest-named polish?

Total untrieds tried: 67 + chevron decals + 3 stamping plates


Monday, June 16, 2014

The Neverending Pile Challenge: Red tips

Hi! I hope all the dads and their families out there had a great weekend! We just got back from a short trip to visit my in-laws and celebrate my sister-in-law's engagement! I did this mani before we left but didn't have time to post it then.

The theme for Friday's Neverending Pile Challenge was red. Red is another of my not-so-favorite polish colors, so I decided to mix it up by pairing red with a nice complementary polish. I used Nina Candi Apple on my index and pinky and the French tips, and Happy Revolution Flip Flip Flipadelphia on the two middle fingers (this was a collaboration between Happy Hands and Polish Revolution and is currently for sale at Polish Revolution). I like the way the red glitter ties everything together!


I loved wearing this mani! There's a reason the French tip is such a classic look!

Total untrieds tried: 60 + chevron decals + 3 stamping plates


Wednesday, May 21, 2014

The Neverending Pile Challenge: matte gradients

Hey folks! Today's Neverending Pile Challenge prompt is gradient. Another great excuse to use multiple untried polishes! For this one I decided to go all neutral and all matte (I have a surprisingly large number of matte neutrals!). I think this is the first time I've done horizontal gradients. I made each nail carry on one of the colors from the previous nail so each blends into the next.


I'm not sure what this reminds me of--TV static maybe? (Do you guys remember static??) The polishes I used were Maybelline Mod Moss, Julep Noelle, Julep Nora and Julep Amber. Interestingly, I tried this mani with a topcoat and didn't like it--I think it accented the different colors and made the mani look kind of confused.


Total untrieds tried: 45


Friday, May 2, 2014

FingerFood's Theme Buffet / Neverending Pile Challenge: A cloud of untrieds

Happy Friday! I'm doing yet another multi-challenge post today! This week's FingerFood's Theme Buffet prompt is something new, and the Neverending Pile Challenge theme is use as many untrieds in one mani as you can. Well, I didn't go crazy trying to cram a million polishes into one mani, but I did manage to knock six polishes off my untried pile!

To satisfy the something new prompt, I decided to try a technique I had never used before: the cloud mani. This kind of nail art, like the fishtail I did recently, seems simple on the surface but requires a decent amount of motor control. Mine isn't perfect, but I really like how it looks! (Pardon the glare in the photo...it's the bane of my existence.)


On three nails, I used Zoya Dove, Zoya Wednesday and Essie Mind Your Mittens. On my accent nail I used Julep Eden, Sephora by OPI Break a Leg Warmer! and Julep Evelyn. I love the combo of greys with all sorts of colors!

Total untrieds tried: 28


Monday, January 27, 2014

Quick swatch: Zoya Bevin

The product in this post was purchased by me. All opinions are my own.

This is a new addition to my collection. I love the color, not so keen on the formula (too runny)!

Zoya Bevin. Two coats with Out the Door topcoat.


The product in this post was purchased by me. All opinions are my own.

Wednesday, January 22, 2014

NEW products at ALIQUID Lacquer!

Good morning! I'm really excited to tell you about my second set of ALIQUID Lacquer polishes, now available for sale!


First up we have three polishes in the Re-Gifted Collection. I made a bunch of polishes as gifts for friends and family this winter, then Trudy picked three to put in the store!

ALIQUID Lacquer Exploradora. Two coats with Out the Door topcoat.

Exploradora was originally made for a relative who used to work for Dora the Explorer (apparently she's a real taskmaster). It's a tan crelly with magenta hexes and small black glitter. I've made this crelly (and the others) more or less opaque in two coats, since I hate having to use a ton of coats with glitter polishes!

ALIQUID Lacquer Gargoyle. Two coats with Out the Door topcoat.

Second up is Gargoyle, an homage to Gargoyle Magazine at the University of Michigan. It's a grey creme with white, gunmetal, gold and copper flecks. Looks like stone!

ALIQUID Lacquer A Pun on Teal. Two coats with Out the Door topcoat.

Finally we have A Pun on Teal. I made this as part of a Secret Santa swap in a nail group I belong to. We're always joking that teal polishes need to have a punny name (like this one, for example), so I skipped the hard part of actually thinking up a good pun. This is a green-leaning teal crelly with matte glitters in multiple sizes and colors.


In addition to the Re-Gifted collection, I've also made a polish to go along with Pantone's Color of the Year for 2014, Radiant Orchid. (Thanks to Jessica at Be Happy and Buy Polish for encouraging me to make this!)

ALIQUID Lacquer Stop and Smell the Orchids. Two coats with Out the Door topcoat.

Stop and Smell the Orchids is a Radiant Orchid-style purple crelly with purple, white and fuchsia glitters, plus white, blue and purple flecks. Super sparkly!


Finally, I made two new scented lip balms that both smell divine: chai and mint citrus!

Go check out the new stuff at my shop! The polishes all retail for $9 (15 ml)/$4 (5 ml) and the lip balms are $2 (or $5 for three). Trudy and I hope you like everything!

Monday, January 20, 2014

Today's mani: Red Mountain

Hey folks--don't forget to enter the January Jamboree giveaway if you haven't already! It ends later today! I'm also participating in an EPIC giveaway at NailNation 3000's Facebook page!

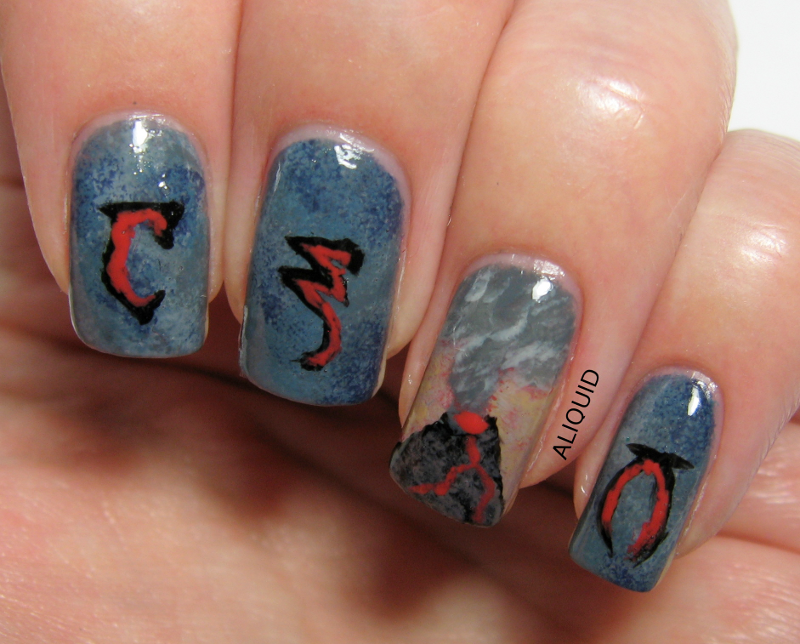
One of my favorite video games of all time is The Elder Scrolls III: Morrowind (ancestor of the very popular Skyrim). It takes place in the home of the dark elves, an island dominated by an enormous volcano called Red Mountain. I wanted to do a Morrowind-themed mani for a long time, but I missed its tenth anniversary last year and put the idea aside. I finally got the opportunity now, because a Facebook group I'm in is holding a video game nail art contest! Here's my entry:


I chose that particular color scheme for three of the nails because the dark elves have blue-grey skin and red eyes. The symbols stand for the three gods of Morrowind--you can see them on the box art for the game:


I used over a dozen polishes for this mani, using a combination of sponging and nail art brushes. If you want to know what any of the colors are, just ask!

I love this game so much I might make some nail polishes inspired by it! Any other Morrowind/Elder Scrolls fans out there?

Tuesday, January 14, 2014

Swatch: Julep Mae

The product in this post was purchased by me. All opinions are my own.

Today I'm wearing one of the polishes I got in my latest Julep Maven box. This month Julep put out several matte and matte shimmer polishes, which I love, so I had to take the box. Mae is a dusty lavender "satin finish" polish, which is Julep-speak for a plain matte creme.

Julep Mae. Two coats.

I love how serene Mae is. It would make a great workday polish!

The formula was typical for a Julep creme: somewhat runny, and hard to get thin coats because the brush is so long and it's impossible to wipe all the excess off. Consequently the polish dried slowly, which isn't great for a matte because you can't add topcoat. One option is to use drying drops, like Julep's or Zoya's, which don't add gloss to your mani. I also note that Mae was pretty much a one-coater for me (although I did two), which is impressive for such a light color!

Mae is available at Julep.com ($14 for 8 ml, $11.20 for Mavens). Click here to become a Maven for free!

The product in this post was purchased by me. All opinions are my own.

Wednesday, November 20, 2013

Announcing...ALIQUID Lacquer!

Hi everyone! I have a huge announcement for you! This will explain why I haven't been posting quite so much lately...I've been busy creating nail polish!

That's right--I've opened my own shop for indie polish, ALIQUID Lacquer!! I'd been daydreaming about making polish for a long time, but it always seemed like a pipe dream. Then one day I decided to buy some sample pigments and suspension base...and there was no turning back after that!

Let me show you the polishes I've made. The name of my first collection is "Happy Birthday to Me" because my birthday is coming up in a few weeks, and what better way to celebrate than to make some birthday-themed polishes?

ALIQUID Lacquer Make a Wish. Two coats with Out the Door topcoat.

The first one is called Make a Wish. It's a blue-grey creme with red and copper flecks, gold/green flecks, blue flecks, and a green-to-red shimmer. It's subtle but pretty! (opaque in 2-3 coats)


ALIQUID Lacquer Carrot Cake. Two coats with Out the Door topcoat.

#2 is Carrot Cake, named after one of my favorite kinds of cake (our wedding cake was carrot!). It's an orange crelly with copper micro glitter, two sizes of white hex, and green dot glitter. (nearly opaque in 2 coats)


ALIQUID Lacquer Quiet Night In. Three coats with Out the Door topcoat.

Finally we have Quiet Night In. This is a blackened purple jelly with tons of flecks of various sizes and colors (including gold, peach, pink, blue and indigo)! Super sparkly with topcoat! (opaque in 3 coats)


In addition to the three polishes, I'm also selling handmade lip balm. I have perpetually chapped lips, and I've tried every commercial lip balm out there. I've been frustrated by the lack of inexpensive balms that aren't made of petroleum products and other filler chemicals. So I whipped up my own balm using mango butter, beeswax, apricot kernel oil and olive oil! It has a luxurious feel and is long-lasting. It has a vanilla scent that isn't too overpowering.

Please give my shop a look and like my Facebook page! As a thank-you to my faithful readers, you can use the coupon code PARTYTIME to get 10% off your order until December 8 (my birthday!).

Keep an eye out for blogger reviews of my polish and GIVEAWAYS!

Wednesday, September 25, 2013

31-Day Challenge #25: inspired by fashion

I had been avoiding thinking about this prompt for a long time, because I had no idea what I was going to do. I've never been interested in fashion in the slightest; 90% of my wardrobe is from GAP, and the rest is mostly funny t-shirts. Eventually it occurred to me that I should just go with what I know. And one thing I have a lot of (from GAP, of course) is argyle.


This mani made me very grouchy. First, I used striping tape to make the diamond shapes, but of course once I removed the tape I had white lines that needed to be filled in, or it wouldn't look right. Since I had to fill in the gaps by hand, it doesn't look as neat as I would like. Then, I used a Sally Hansen nail art pen for the dotted lines--I started with dots, like you see on my socks, but it didn't look good, so I connected some of the dots to make dashes. But I think this pen was too thick for this design. (Do they make super thin nail art pens? Like the size of thin mechanical pencils?) And the pen also stained my skin! Boo.

ANYWAY the colors I used were Essie Lapiz of Luxury, Revlon Timeless and Sinful Colors Snow Me White (plus the turquoise art pen).

I didn't put a topcoat over the turquoise, and it washed off almost completely in the shower, so I took a quick picture of just the diamond pattern:


Here's hoping tomorrow's mani turns out better (even though I have no idea what I'm going to do yet...).

And don't forget to check out everyone else's fashionable manis!


Wednesday, September 18, 2013

31-Day Challenge #18: half moons

This was another mani that I barely had to think about. I already knew what color scheme I wanted to use--I borrowed it from this outfit in Dragon Age II:


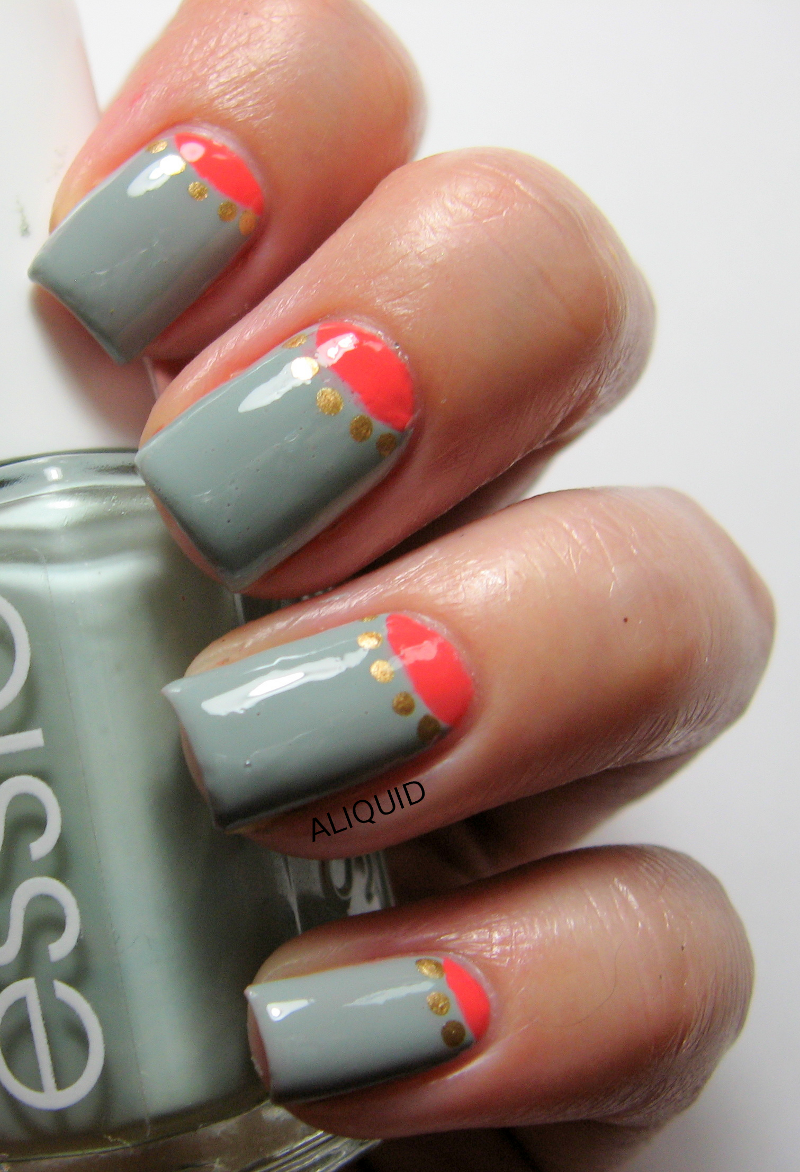
I like the way the coral contrasts with the blue-grey! So this is what I came up with:


The coral is Julep Gloria, the grey is Essie Maximillian Strasse-Her, and the gold is Maybelline Bold Gold. To make the half-moon shape, I used Orly French tip guides, but they didn't give me enough curve so I touched up the half moons by hand.


Now go admire today's other half moons!


Wednesday, August 7, 2013

Today's mani: my first try at striping tape

I bought a roll of striping tape a while back but never got around to using it until yesterday. It was easier to use than I expected! Whenever I do Scotch tape manis, some polish inevitably leaks under the edge of the tape somewhere, but that didn't happen with the striping tape!

Anywho, this mani's pretty basic, but I love the combo of grey and pink.


The grey is Julep Meryl and the pink is Zoya Belle. (My other fingers have Belle layered over white, since it's a jelly and I wanted it to be opaque.)

Next time I'll try a more interesting striping pattern!